Edit Videos and cut using Photoshop CS4 Extended
Above you see a video from one of my favourite blogs called DESIGNLOVEFEST. Apparently this video was made using an iPhone and edited using Photoshop. On DESIGNLOVEFEST you can book about Photoshop for bloggers. At the moment my baby is too small to be able to take part in one of these courses, even though they seem so interesting. In the meanwhile I have already met a blogger fom Australia, who recently joined a Blogshop course. It seems that even Holly Becker (famous blogger, founder of decor8blog) wanted to ask Bri (founder of DESIGNLOVEFEST) to teach her to make videos.
For this post I would like to create a pro-memoria of how I edit videos at the moment (using free software for PC). It took me about a year to learn to make them. You can find all my videos on and .
This is my work process for video shooting and editing.
a) Develop ideas, create storyboard and making lists, finding and preparing location, etc.
b) Shooting of film material
c) To directly capture material from the computer screen I use the following software: Microsoft Expression Encoder 4 and Microsoft Expression Encoder 4 Screen Capture
d) I record my own voice using an iPhone or the iPad via the following programme Reclouder auf. I then send myself the file via email.
e) When I want a professional English voice (male mothertongue speaker), I let someone do a professional voiceover. This costs about 5 USD per minute of speech. Visit the following website Fiverr to see more services for 5 USD. Just simply have a look.
f) Importing of data via cable or via email.
g) Opening the film material in Windows Live Movie Maker Version 2011 (free software available for download), cutting of video, then adding the sound and possibly image files.
h) It is important to find the correct settings to be able to make the video adapt for full screen viewing. If I insert image data I set the image size to 640×360 Pixel. Using the menu “Project” in Windows Live movie Maker I set the value to widescreen (16:9).
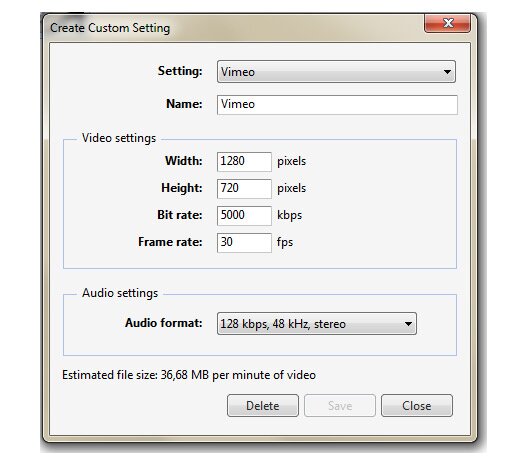
i) I added the following custom settings for saving the correct settings for Vimeo when saving the finished movie file:

j) Uploading and creating the right settings for Youtube is automatic on Windows Live Movie Maker version 2011, just click the Youtube button on the top menu.
k) Yesterday I tried editing a video using Photoshop CS4 Extended. A video made with Windows Live Movie Maker 2011 cannot be directly opened in Photoshop CS4 Extended, because the file extension .wmv cannot be opened. Therefore choose Layer>Video Layer>New video layer from file…. A good article about video editing using Photoshop CS4 Extended can be found here.
l) In Photoshop you can edit the video like you would a normal photo. You can also open the timeline and insert images or writing in your video. Inserting frames or cutting the whole video is easy in Photoshop. I don’t know how you can make the video run faster than the speed at which it was recorded, but I gues it’s possible too. When you’re done go to File>Render video.
To convert the file extensions I use two programmes:
1. Adobe Media Encoder CS4
2. Media Converter
While working on understanding Photoshop CS4 Extended for video editing purposes I saw that Adobe will give up selling packaged software from now on and will pass to a subscitpion base for using the software. this system is called “Creative Cloud”. Until 7th April there are good prices for subscription. I am just thinking about subscribing to this new service or to buy my upgrade for the packaged Adobe Creative Suite. What do you think?
This post is also available in: German


 Nina Levett creates edgy and provocative tableware and textiles. This blog is about her design process and graphics, ornaments, patterns and inspirations.
